What is a Cold Frame?
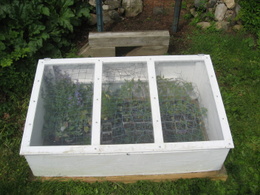
A cold frame is simply an unheated box with a transparent cover to give protection to young tender plants from the cold and wind. It captures heat from the sunlight during the day and holds the heat from escaping at night. It functions like a smaller version of an unheated greenhouse.
It allows you to extend your growing season in the spring and the fall. A rough guide is that you are able to shift your USDA zone approximately 1 to 1.5-zones to the south.
For example, if you lived in Columbus, Ohio zone 6, it would be like you are in Atlanta, Georgia zone 7, some 400-miles to the south. No matter where you live, that 1-zone shift is a big advantage in your gardening success.
Instead of moving, you can do it in less than a day and extend your garden by months.
In the spring time it is very useful in starting some of the cold hardy plants, such as beet, broccoli, Brussels sprouts, cauliflower, collards, lettuce, onion, pea, radish, spinach and Swiss chard.
It is also a very good way to harden off your plants before planting them outside in your garden. It gives them a protected enclosed environment while they get used to being outside.
During the summer a cold frame can be used for starting vegetables for succession planting and for fall planting. Flowers can also be started in pots before putting them in your flower bed.
In the fall you can keep your lettuce, spinach and other cold hardy vegetables going well into the winter. In the warmer southern states, you might have something growing all winter long.
What to Look For
There are many sizes and styles of cold frames that are available online and in stores. They are all knocked down in a box to allow it to be shipped. In most cases all that is needed to assemble it is a screwdriver.
Sizes can range from 2-foot by 3-foot to 3-foot by 5-foot in size. This will allow you to reach your plants from the front or the sides. There are some very small low-cost entry level cold frames available. Prices go up depending on the size and features.
Clear transparent single wall panels for the top cover window are on the least expensive ones. It will let a lot of light in, but do not offer much in the way insulation to retain the heat captured during the day.
A better choice would be translucent twin wall panels that may also be called multiwall or corrugated panels. The twin wall panels are widely used in greenhouses and typically provide ultra violet and thermal insulation properties. The initial cost will be higher, but the benefits are worth the additional cost.
To prevent over heating during the day a good way to prop the cover open is needed. A simple stick is often used to prop the cover open, but if there is a gust of wind that pushes the cover up the stick will fall away. With the prop stick gone the cover will now drop down and your plants are very likely to suffer and die. The same can happen with a hook and eye. There are locking hook and eye latches that might be suitable for your use.
Wind is very powerful, so look for one that has a good clamping mechanism that will securely hold the cover open.
Like your garden, your cold frame should get at least 6-hours of sun each day. If possible, place it next to a south facing building, where it will get the proper amount of sun and at the same time it will receive some protection from the wind.
Build Your Cold Frame?
Many gardeners who are handy and have the tools needed, will chose to build their own.
It is easier to make the cold frame cover first and then make the base to fit the dimensions of the cover. If you make the base first you may find it difficult to make a cover to fit it.
To save money sometimes old window sashes are used, but should be avoided, since they may contain lead paint. They also can be heavy and the glass is easily broken. Old aluminum framed storm windows can be successfully used if you can find them.
You can save money and time if you use standard polycarbonate precut panels. A clear plastic such as polycarbonate or acrylic is available in almost any hardware or big box store. First see what standard precut sizes are available. It may be easier to use two or three standard precut panels instead of one large panel.
First decide the approximate size of the cold frame you want to make. If you build the window frame first, you may find out that you will need to cut down a large panel to fit the frame. The portion left is not likely to have any use and will be discarded.
Screws can be used to secure the panels to your wood frame. Predrill the screw holes slightly larger than the screws, which are available with rubber washers attached. The screws should be lightly snugged down to allow for the natural expansion and contraction of plastic sheets. Too tight can also cause the panel to crack. Another option is to use plastic screen clips.
As mentioned above a better choice is using translucent twin wall corrugated polycarbonate panels. It is often used in greenhouses and allows sunlight to pass through and retain heat at night. Use H-channels to connect two panels together.
To keep water and debris out of the flutes, solid aluminum tape should be used to seal the top end of the panel. To seal the bottom use vent tape such as LEXAN Thermoclear vent tape.
The wood frame for the top cover can be made from 1 by 2 or 1 by 3-inch boards. It is a little more expensive, but pre-primed wood will give the best results. Prime the cut ends first before assembling. The pieces can be joined with angle support brackets or pocket screws. The assembled frame should be given a couple of coats of a good quality trim paint. This will ensure that it will last for many years.
Make the base slightly smaller than the top cover to allow complete coverage and to let water to run off.
The base is made much like a raised bed using 2 by 10 or 2 by 12-inch lumber. Cut to length and screw together.
It is also helpful to make the front a bit a bit lower than the back. This will allow rain to run off and to capture more sun. Cut another board the same length as the sides. Draw a diagonal line on the board. Carefully cut on the diagonal line and you now will have two wedge shaped boards that can be secured to the sides. Next cut another board to length to fill in the back between the two wedge shaped boards.
Place the cover on the base and secure it with a pair of hinges on the rear edge. Give it a few trials first and you will be able to enjoy another useful addition to your garden.
As with the pre-built units, make sure that there is a secure way to hold the cover open during warm days.
As a practical matter it is better to have two, rather than one very large cold frame. You could make one for starting plants and another slightly larger one for hardening off plants.
Automatic Vent Openers
There are automatic vent openers that are available. The automatic openers typically use a thermostatic element to raise the cover and do not need electricity to operate.
When the internal temperature of the cold frame warms up, the opener raises the cover, and as the temperature cools, it automatically lowers it. Look for one that allows you to adjust the temperature setting.
They can be used if the cover is not too heavy. Take this into consideration when making the cover.
Over time, the automatic openers can fail and your cold frame can overheat. It is recommended to install them in pairs for reliability.
Tips and Warnings
A cold frame can easily over heat on a sunny day and cook your plants. It can be heart breaking to find that your plants are dead when you come home from work.
When the early morning temperature reaches 40-degrees or the forecast is for warm weather, the cover should be securely propped open during the day. To retain heat, it should be closed again at night. On a very cold night an old blanket can be placed over the cover.
In the rush getting to work in the morning, it is easy to forget to prop open the cover. One trick is to make a small board and put a message on it. When you close the cover at night put it on your car seat. You will find it in the morning.
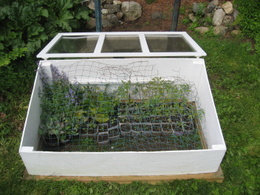
If you have deer around your property, the cold frame should be in a protected fenced area. If it is outside of a fenced area, another option is to place a piece of fencing inside of the cold frame, as can be seen in the photo above.
Sources: Gardener’s Supply Company, Home Depot, Walmart.
Garden Spikes newsletters give you timely information once or twice a month. Subscribe Free to the Garden Times newsletter below.
Your email address will only be used to send you a newsletter and will never be sold. You can unsubscribe at any time.


