Composting
Composting is the easiest and most environmentally friendly way to use a valuable resource. There are many towns where you will see large piles of leaves raked out into the street waiting for the town to come by with a large truck that vacuums them up. Other towns require that the leaves be placed in large paper bags for pickup.
A compost pile is an important part of organic gardening. All organic yard waste and kitchen scraps can be used. Composting is an easy way to handle your yard waste.
Leaves should always be shredded before adding to your compost bin or using as a mulch around your vegetable garden or your flower bed. A lawn mower with a grass catcher does a good job of shredding the leaves as well as cleaning up your lawn. Shredding the leaves avoids them from matting together. Shredded leaves break down faster and allow water to pass through to the underlying soil.
For a small yard another method is using a cordless battery powered leaf vacuum mulcher. Use it to shred up leaves from around trees as well as in your flower beds.
The compost you make will be free of pesticides and herbicides.
Soil Feeds the Plants
All plants need nutrition to be healthy. A good garden soil high in composted material will have everything your plants need.
Proper garden basics will insure that you will have strong healthy plants. The soil structure in your vegetable garden or flower bed is very important. It needs to have humus, which is organic matter which has broken down.
It contains the minerals and natural organic nutrition needed to grow strong plants. It allows the soil to absorb water and gives the roots an easy place to grow.
What Are the Ingredients?
Feed your compost pile with leaves and weeds that you pull up as well as scraps from the kitchen. All organic things should be composted. A compost pile is an important element in achieving a successful garden.
What you put into your pile should consist only of brown or green organic material. These are the wet or dry materials that come from a source you can trust. This is similar to making soup where you put in various items, which when finished, will give you humus which is what gardener’s call black gold.
There are differing opinions as to what the best ratio of browns and greens should make up what you add to your compost. A good ratio is 1-part brown and 2-parts green. Too much brown at one time will be too dry and not decompose. Too much green at one time will be too wet and may turn slimy and smell. In either case if that should happen just turn the pile over to blend everything together.
What you want to achieve is a nice damp environment in your pile for the microbes and earthworms to do their work. If everything is working and your pile is cooking it will feel much warmer inside than the outside. If your pile is too dry from adding too much browns or a lack of rain, just add some water to the pile. If your compost is too wet, add some browns or turn it over more frequently to dry it out.
The browns can come from: shredded leaves, coffee grounds, tea bags, crushed eggshells, hay or straw.
The greens can come from: vegetable and fruit scraps, weeds or manure.
Do not add these things: fats & oils, diseased plants, pet and human feces, meat, fish, dairy or treated wood.
It is beneficial to help get good compost by leaving some of the native soil on the roots of the weeds you put into your pile. The native soil on the roots has all of the microbes needed to get the decomposing process started. You do not need to buy anything to get the process started because nature has provided you with everything that is needed. About the only time an additive might be needed is when the native soil is very sandy.
Plant matter is broken down and decomposed by many organisms in the soil such as bacteria, fungi and worms.
The greater the mixture of organic material you put into your compost bin will give you the best organic compost for your garden. Remember that everything organic that comes from the earth should be returned to the earth.
Kitchen Compost Pail
There are many types of containers to choose from. There are plastic ones that hang from the inside of your cabinet door. There are ceramic crocks and stainless steel pails as well as metal ones that look like a small version of the old dairy milk cans.
It might be tempting to get a large one, but unless you generate a large amount of kitchen scrapes it might be better to get a smaller one. The reason for this is that you should empty the container daily or at least every second or third day before you notice any odor or see a cloud of fruit flies or mold to start growing. The compost container should have a cover on it and some gardener’s will keep the closed container in the refrigerator or freezer.
To make it easy to empty your pail when you take it out to the compost pile, line the inside with newspaper or use a small paper bag. This is a good way to recycle your empty flour and sugar bags. Just dump it all onto the compost pile. Your pail will stay cleaner longer. If the bottom of your pail is very wet you should add more newspapers or used paper towels and empty it more often.
How to Compost
It can be as easy as tossing things into a pile or heap. Some people avoid composting because they feel it looks unsightly. Every yard should have a small non-manicured natural area. Your area could be placed behind the garage, over in the far corner of your yard, or better yet, very close to your garden.
Trench composting is a method that is often used instead of a pile. All you need to do is dig a trench in an unused area of your garden several feet long placing the soil alongside the trench. Kitchen scraps, yard waste, etc. is placed in the trench. When that section is full just cover the trench with the soil that was removed. Now just repeat by digging the next trench.
Another method is post hole composting, which is done by digging a 12 to 18-inch deep hole with a post hole digger. Dig several holes close together at one time and when done cover the holes with a board so that no one steps into the holes. Now you have a place to put your kitchen scraps, weeds or any other garden debris. When the hole is almost full top it with soil and go on to the next hole.
If you want to hide the pile or bin you could put up a low fence or better yet a living hedge of forsythia with its beautiful yellow flowers in the early spring or a burning bush with its red leaves in the fall. There are also many shrubs to choose from. There are some ornamental grasses that would make a good screen. Check with your local garden center for what would be best to plant in your climate zone.
Compact Bins
Many gardeners just simply throw everything into a pile and when it reaches 2 or 3-feet high, they start a new one. This will work just fine, but the piles take up more room.
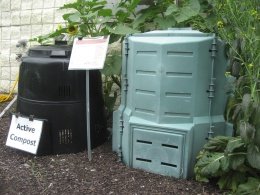
Most gardeners like to keep things more orderly by using a bin of some sort. There are round plastic ones like the Earth Machine that are suitable for a small yard. This style has a cover on top you remove to drop your scraps into and a door on the bottom to remove the compost.
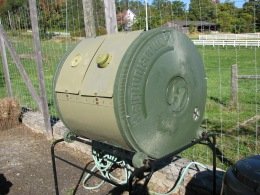
There are various styles of tumbling barrel units that do not take up much room. The amount they may hold could fill a wheelbarrow. This amount of damp humus can take a fair amount of effort to turn the tumbler.
Larger Bins
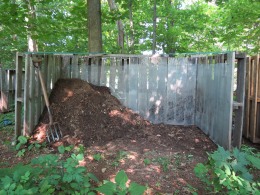
Most gardeners will most likely generate many wheelbarrow loads of material to be turned into humus. In this case an adequately sized holding bin would be more useful. These could be made of wood, plastic, cement blocks or shipping pallets.
A simple bin can be made from a section of wire fence and pulled into a circle with the ends wired together. When it is time to turn the compost pile over, you can pick up the wire cage and place it next to the pile and using a garden fork, transfer the pile into the wire cage in the new location.
Many are closed on all 4-sides to keep everything inside. This style usually has sections you can remove to get in to turn the pile over.
Shipping Pallet Bins
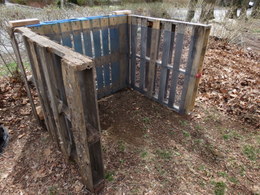
A bin that is closed on 3-sides and open in the front will keep things in place and still will allow you to easily reach in with a garden fork to turn the material over.
Shipping pallets are discarded by many companies. They are often placed by the road with a sign stating that they are free for taking. Many companies recycle used shipping pallets and send them back to the warehouse when a certain quantity is reached. Some special size pallets have a deposit on them. Do not trespass on private property to take pallets stacked by the shipping dock. Ask the owner if you are not sure.
Some discarded pallets are damaged. With a bit of work they can be taken apart and used to repair another pallet.
A small compost bin can be made from 3-shipping pallets. If you have more room a larger open front bin can easily be made from 4-shipping pallets.
Make sure that the pallets are all of the same size. In the United States the most popular pallet size is the Grocery Manufacturers’ Association (GMA) pallet, which is 48-inches long and 40-inches wide. There are many other sizes in use, so measure them and use all of the same size for your compost bin.
Wire could be used, but several 10-inch scrap pieces of a 2x4 can be used to secure the pallets together. You can nail the pieces of the 2x4s, but 2-1/2-inch deck screws work better. Many pallets are made from hardwoods and drilling pilot holes for the screws will make the job easier. In the future, which might be 5 or 10-years from now, it will be much easier to take it apart to replace a decayed pallet, if you use screws to hold it together.
To make the 3-pallet bin, stand 2-pallets with the shorter dimension up and at a right angle to each other to make the left side. Now screw a 2x4 at the top and one at the bottom. Now do the same for the right side.
To make a 4-pallet bin do the same as the 3-pallet bin by putting together 2-pallets to make the left side. Now put together another 2-pallets to make the right side.
Move the left side and the right side together and align the back so that it is straight and both pallets line up evenly. A 3-foot 2x4 can be screwed across the top and another screwed across the back will secure the pallets forming the back wall together. To add strength to the ends, attach a pair of 3-foot metal fence posts or wood on a diagonal to brace the ends.
One person can build this bin if you put together one side first and then the other side. If you try to build the 8-foot-long back wall first and then attach the sides you will need two people.
Move your bin to its final location. To ensure that your new bin will last a long time, raise it off of the ground by resting it on bricks. You can use a shovel to pry it up enough to place 3-bricks along the back and a brick on the left side and another on the right side.
To keep your yard waste in your new bin, just take some 36-inch-wide window screen and staple it on the inside. It will last a long time if you are careful using the garden fork when turning the pile. Hardware cloth can also be used to keep everything inside.
Shipping Pallet Safety
To prevent the spread of invasive insects such as the Asian Longhorn Beetle and the Emerald Ash Borer all wood that shipping pallets are made from is treated in some way. Shipping pallets used to be treated with Methyl Bromide. Methyl Bromide was phased out completely in 2005 in the United States and Canada. Pallets today are heat treated to kill any insects in the wood and are safe to use.
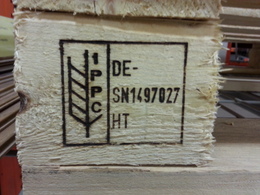
Shipping pallets are now required to have an International Plant Protection Convention (IPPC) logo. The IPPC logo certifies whether the pallet was fumigated with Methyl Bromide and will have MB stamped on it. If it was heat-treated the pallet will be stamped HT. Wood that is debarked will be marked DB. The IPPC logo will also have the 2-digit country code on it. A short list is US for the United States, CA for Canada, CN for China, DE for Germany and MX for Mexico.
Stay away from a pallet marked DBMB which means that it was debarked and treated with Methyl Bromide and may have come from China, which has continued to use it.
Some pallets do not have a stamp or mark on them. These are referred to as a “national pallet” and are to be used for domestic transport. Many domestic companies make their own pallets, which are not a standard size, to suit the equipment being shipped. They are not supposed to be treated with chemicals and should be safe, but unless it contains the IPPC logo you do not know for sure and it may be better to not use it. Do not use a pallet that is dirty or is stained from what could be a chemical spill on it.
How Often to Turn Your Pile?
Compost will happen all by itself, but turning the pile really speeds everything up. On a very hot summer day as the Sun starts to set and the air cools off is often a good time to do a little turning.
Turning over the entire pile in your bin every week or so with a garden fork or shovel is all it takes, or just a little bit of it at a time when you think about it will also work. It does not have to be done all at once.
When you turn the pile, you will notice how much smaller it gets each time you turn it. It will start to look more and more like the black gold we are looking for.
There is no magic additive needed, just an occasional turning and let the microbes and earthworms do the rest. If your pile is too dry add some water to it to keep the pile moist.
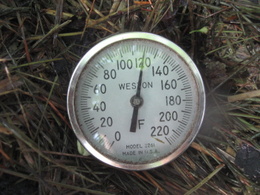
As you turn the pile you may notice that it is very warm. This is a good indication that the microbes are breaking down the organic material. Temperatures over 110-degrees F will kill many weed seeds. A large compost pile that has the right amount of moisture may reach 160-degrees F will kill almost all weed seeds.
Turning the compost pile helps break up and distribute the material. Also air and moisture get blended in so the microbes can decompose the yard waste. Your compost pile is very attractive to any trees or shrubs nearby. If you forget to turn it for a long period of time you will find that many roots have found your compost pile and may make it difficult to turn. Turning your compost pile more often will discourage the invading roots.
Tips and Warnings
Grass clippings should be mulched and left on the lawn. Do not compost grass clippings from any lawn that had a 'weed and feed' applied to it. If you are not absolutely sure, do not put them in the compost bin.
Do not use grass clippings to mulch your vegetable garden, shredded leaves or pine straw are better for the plants.
Herbicides are designed to kill all other plants without harming the turf grass. Herbicides can also be present in horse and cattle manure, if they fed on grass in a pasture that had an herbicide applied on it.
Some herbicides are very persistent and can take many years to break down. Some of the herbicide levels might be in the parts per billion and can be very expensive to test for.
If a mistake was made, the compost can be spread very thinly on the lawn where it will not harm anything.
Compost Bin Sources
Sources: Gardener’s Supply Company, Home Depot, Walmart.
Garden Spikes newsletters give you timely information once or twice a month. Subscribe Free to the Garden Times newsletter below.
Your email address will only be used to send you a newsletter and will never be sold. You can unsubscribe at any time.
