Kale Growing Guide
Kale (Brassica oleracea) is one of the cruciferous vegetables you should eat on a regular basis and is an important source of essential nutrients and fiber.
It contains a compound called sulforaphane. Sulforaphane belongs to a group of phytochemicals that are reported to be helpful in the prevention of cancer.
A partial list of common cruciferous vegetables is: bok choy (Chinese cabbage), broccoli, Brussels sprouts, cabbage, cauliflower, collard greens, kale, kohlrabi and radish.
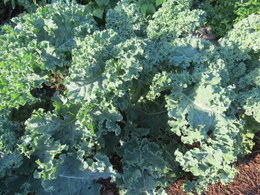
It is a cool season vegetable that is in the cabbage family. It can be found in flat leaf and curly leaf varieties, with curly leaf being the most popular. It does not form a head; the leaves grow from the top of a central stalk with the lowest ones harvested first.
Kale reaches 24-inches high and spreads 24-inches wide. It is a biennial making it resistant to bolting and grows well throughout the season until killed by a hard freeze.
Starting from Seed
Follow the seed packet instructions, seeds can be started indoors 6 to 8-weeks before your last expected frost date.
Sow the seeds 1/4-inch deep in a sterile seed starting mix in cell packs or pots. Lightly cover with the seed starting mix and keep moist. Germination takes 10 to 21-days.
Bottom watering is the easiest way to keep moist without disturbing the newly sown seeds.
Kale seeds can be planted directly in the garden in the early spring when the soil reaches 40 to 45-degrees F. Plant the seeds 1/4-inch deep and 1 to 2-inches apart in rows 18 to 24-inches apart. Thin to 12 to 18-inches apart. The kale that is removed can be eaten or transplanted to expand your crop.
For fall planting, direct seed about 3-months before the first average frost. When touched by frost the flavor improves and it can withstand temperatures in the low 20s with a light row cover.
For more detailed information visit the seed starting page.
Soil Preparation
The soil should be nice loose well drained organic garden soil with the soil pH between 6.5 to 6.8. As soon as the soil is frost-free and can be worked, till the soil by digging down 8 to 12-inches turning the soil over with a garden fork. Remove any large rocks and stones. The small stones remaining will do no harm and actually benefit the soil by adding some micronutrients to the soil.
Planting Kale
Kale is a cool weather annual vegetable and can be planted in the garden 4 to 6-weeks before your last expected frost. Plant it in an area so that it gets 6 to 8-hours of sun. Kale can be planted as close as 12-inches apart, but they will be a bit crowded, so a spacing of 18 to 24-inches will give them more room.
It should be planted deep enough for the roots to be covered by the soil, but do not bury the crown, which is the growing bud. The new growth comes from the center of the root crown. The plant may rot and die if planted too deeply. Water plants as soon as they are put in the ground and then weekly especially during dry spells.
Watering and Care
When the plants are a few inches tall add a nice loose mulch of shredded leaves or pine straw to shade the plant roots. This will keep the weeds out, the soil cooler and help retain moisture. Keep the mulch a couple of inches away from the stem. During dry spells give some water each week.
If needed you can feed with an organic fertilized such as Espoma Garden-tone.
Harvesting Kale
Kale matures in about 45-days, but if you started your plants from seed you can start by thinning and removing any plants that are too close to others to give them more room to grow. On young kale plants, be careful when removing leaf stalks. You do not want to pull the plant out of the ground or disturb its roots. Use a sharp knife to cut 1 or 2 outer leaf stalks at the base of each plant taking care not to injure the new leaves growing from the central crown.
Established kale is very frost tolerant down to the low 20-degree range and will continue to grow. Depending on your growing zone you may be harvesting your kale up to and perhaps past Christmas. A light row cover can be used to cover your kale overnight to give some protection on the heavier frost nights.
Diseases
There are several diseases that affect the cruciferous vegetables. These occasionally affect the roots and leaves. Crop rotation and removal of diseased plants is the best way to control them. Increasing plant spacing in the future helps increase air circulation around the plants.
Pests
Most of the cruciferous vegetables are all affected by many of the same pests. Some of these are: aphids and several species of cabbageworms and caterpillars.
The easiest way to deal with aphids without using chemicals is to knock them off with a spray of water. Ladybug beetles will eat many aphids. Many gardeners will purchase them and release them in their garden to help control the aphids that are a problem with many plants. Serious infestations can be controlled with an organic product such as insecticidal soap or neem oil. These are both organic controls that are very effective.
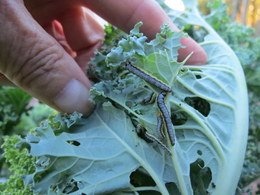
The cabbageworms and caterpillars cause damage by eating holes in the leaves. The adult moth lays small eggs on the underside of the leaves, which hatch out as larvae and do the damage. They multiply very rapidly, so inspect your plants often early in the morning, between the leaves and the underside for small caterpillars and egg masses.
Cabbageworms can be removed by hand picking them as you inspect your plants. Spraying your plants every 1 or 2-weeks with a special variety of BT (Bacillus thuringiensis var. kurstaki) will kill the cabbageworms. There are also several products that contain spinosad, a naturally occurring insecticide.
Duct tape helps to remove the caterpillars and eggs. Take a piece about 8 or 9-inches long and attach the ends together to form a loop with the sticky side out. Put one hand through the loop and with the other lift up a leaf looking for any caterpillars or eggs. If you find any caterpillars stick them to the tape and do the same for the eggs.
Cabbage root maggot larvae feed on the roots of the plants, which in the beginning causes wilting and plants to die later on. The best prevention is to toss the entire plant in the garbage after harvesting, including any soil that clings to the roots. The best way to reduce any future problems is to rotate your crops to a new location each year. Row covers are about the only way to control the cabbage root fly. Place the row covers over the plants in the spring right after putting them in the ground.
Popular Varieties
Popular varieties: Dwarf Blue Curled, Dwarf Siberian, Lacinato, Olympic Red, Premier, Redbor, Red Russian, Scarlet, Siberian, Storm, Toscano, Ursa, White Russian, Winterbor.
Sources: Seeds Now, Burpee, Harris Seeds
Garden Spikes newsletters give you timely information once or twice a month. Subscribe Free to the Garden Times newsletter below.
Your email address will only be used to send you a newsletter and will never be sold. You can unsubscribe at any time.


