Potato Growing Guide
Potatoes (Solanum tuberosum) are very easy to grow and do not take up very much room. There are more than 1,000 varieties and all of them are better than store bought. Do not try using any from the store because they most likely have been treated with an anti-sprouting chemical to retard sprouting.
Order your seed potatoes from a seed catalog or a garden center. A good source is a fellow gardener or a farmer’s market in late summer. Ask them if they are organically grown. Many farmers follow good organic gardening practices, but do not go through the expensive certification process.
If the ones on display range from the size of an egg to a pound or more it is a good indicator that the farmer grew them themselves. If they are all about the same size then most likely they were commercially sorted and purchased for resale. If they are organic, then buy several pounds of each variety, picking the larger ones for eating and some smaller egg sized ones to be your seed potatoes which you can store over the winter for planting after the last frost. When you buy them mark the bag so you remember what kind you bought.
A good way to store your small egg sized ones is to put them in a large or extra-large egg carton. Mark the carton with the variety and the date, put loosely in a plastic bag to keep them from drying out and then put them in your refrigerator over the winter. When stored at 40-degrees F the potatoes go to sleep and will keep over the winter.
Getting Started
Take the seed potatoes out of the refrigerator about a month before you plan to plant them. Place them in a dimly lighted room that is 60 to 70-degrees Fahrenheit for a week. You can then move them closer to a window, but keep out of direct sun, but in good light.
Soon you will see them start to sprout. This process is called chitting and will give them a bit of a head start. By letting them sprout you can pick out the best ones to plant. If they are exposed to light they may turn green, which is not harmful at this time.
Planting Potatoes
They need full sun and the soil temperature should be at least 50-degrees Fahrenheit, which in many places may be 2 or 3-weeks after the last frost date. They may grow to 2.5 to 3-feet in height and can be placed in front of pole beans or cucumbers grown on a trellis.
A very small seed potato, about the size of a chicken egg, can go right into the ground whole.
A large one can be cut into smaller pieces with 2 or 3-eyes on each one, which are very easy to see if the potatoes were chitted first. Make sure that each cut piece with 2 or 3-eyes has enough flesh on them. If there is not enough flesh it may rot and die. As the sprouts grow they get their energy from the flesh.
Prepare your seed potatoes a day or two before planting. If you divide a large one into smaller pieces it is a good practice to let the cut surfaces dry and heal over. After cutting, place the cut pieces in a single layer and let them air dry for 1 or 2-days to let them scab over.
If you have problems with fungal diseases, dust them with powdered sulfur to help prevent rotting.
They can be grown in the traditional row, containers or grow bags.
If the potatoes were chitted first make sure that the new growth is not completely buried.
The Row or Hill Method
The traditional way to plant is to dig a trench about 12 inches deep and the width of your shovel, placing the soil you removed in a nice mound alongside the trench.
Plant the seed potato with the sprouted eyes up. This is where the plant will grow from. Space them about one foot apart and cover with about three inches of soil, lightly tamping down. The adjoining rows should be 24 to 30 inches apart. Remember that the potatoes will be forming underground and should not be crowded.
A fingerling such as “Russian Banana” needs more room to grow and should be spaced about 18-inches apart. If you have good garden soil, fertilizer is not needed. If a soil test is done and some is needed, then a good 10-10-10 fertilizer can be applied at the rate of a tablespoon put between the seed potatoes and scratched into the soil. Now cover them with about 3-inches of soil lightly patted down and then watered.
In about 2 to 3-weeks the green growth will appear. When it is about 6-inches high, add about 3-inches of soil, making sure not to completely cover any of the shorter stems. It is very important to make sure that any forming tubers are not exposed to sunlight. Sunlight will make them turn green, which should not be eaten.
As they continue to grow, hill the soil previously removed up against the plants. This will encourage the formation of more potato tubers. Repeat the hilling as the plants grow. When the flowers appear it is a sign that you could carefully dig down with your fingers and pull up a few new potatoes. After about 10-weeks the growth will slow down and the foliage will yellow and die off.
They can be carefully dug up any time after the tops die back, but before a frost comes. It is better to get them out of the ground sooner than later. The longer they are in the ground the more time there is for various insects or other critters to find them and start chewing on them.
Containers
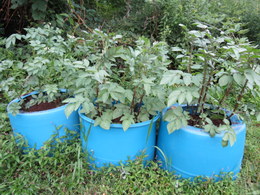
Potatoes can also be planted in containers such as half of a wine barrel or a plastic 55-gallon barrel that is cut in half. Holes should be drilled in the bottom for drainage.
If your space is limited and all you have is a deck or patio you could use a Potato Grow Bag such as one from Gardener’s Supply Company.
Planting Your Potatoes
To plant your potatoes make sure that the drainage holes are not blocked and that they will get full sun. They really grow well in potting soil or a very light garden soil. Adding some peat moss to your garden soil will be helpful. Put 4-inches of soil on the bottom and then put in 5 to 8-seed potatoes spaced evenly. Cover them with 3-inches of soil and water them in. As the plants grow and reach 6 to 8-inches in height, add more soil, a few inches at a time, to encourage the production of more potatoes. Make sure that you do not cover up any of the slower growing stems. Continue adding soil as the stems grow.
Since your barrel is essentially a container, you will need to treat it that way and make sure you give them enough water. In the heat of the summer you may need to give each barrel 1 or 2-gallons of water each day.
When the plants flower and later the leaves turn yellow and wilt the potatoes are as big as they will ever get. All you need to do now is to tip your barrel over and pick out the potatoes from the soil. No damaged ones from a spade or fork.
The barrel method can be very productive with each half barrel yielding perhaps 5 to 10-pounds of potatoes of many sizes from 1-inch in diameter to a pound or more. Put aside enough seed potatoes the size of an egg for next year and eat the rest. They will store best in a root cellar or a cold portion of a basement. They should be covered to keep them dark so that they do not turn green or start to sprout. If need be they can be stored in your refrigerator.
The soil can be used for another purpose or put aside and used next year.
Pests
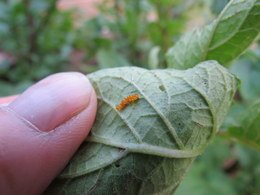
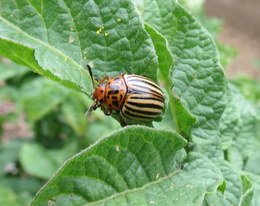
The major pest is the Colorado potato beetle (Leptinotarsa decemlineata). Inspect your potato plants often looking for any leaf damage. Also look at the underside of the leaves for orange egg masses. If you find any, cut the leaves off and put in the garbage, not your compost pile.
In the larval stage they will do a lot of damage and can defoliate an entire potato crop reducing yield and in some cases, may even kill plants. There could easily be dozens of Colorado potato beetles on each plant.
The beetle can also be found on plants in the nightshade family such as eggplant, pepper and tomato.
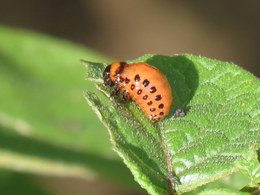
After hatching the potato beetle goes through four stages of development called instars. The plump soft bodied larva can range in size from 1/8 of an inch to 1/3 of an inch long. Their color can range from reddish brown to orange with two rows of black spots on each side. At the end of the fourth instar the larva will drop to the ground and burrow into the soil to pupate, later to emerge as an adult.
The adult Colorado potato beetles are orange-yellow in color with ten black stripes on the wing covers and are 1/3 of an inch long. The adults continue to feed on the leaves and after mating the female can lay hundreds of eggs to continue their life cycle.
It is most important to remove the larva, adults and egg masses. This will prevent the formation of the larva which does most of the leaf damage.
The easiest way is to hand pick the larva and adults with tweezers, tongs, and needle nose pliers and then drop them into a container of soapy water to kill them. Check your plants two to three times a week and then daily if you see them and you should be able to keep the beetles under control.
The adult Colorado potato beetle is often hard to see on your potato plants. Look for them early in the morning. The adult does not do a lot of damage. Concentrate on finding the larva and eggs to control them.
Depending on location there might be one to three generations each growing season. The mature larva will drop from the plant to burrow into the soil and pupate, later emerging as adults to start the cycle over again.
Mulching with shredded leaves or pine straw may help to interrupt their life cycle. Another method is not planting potatoes in the same spot for two years.
There is some anecdotal evidence that potatoes grown in containers do not have problems with the Colorado potato beetle. The adults overwinter in the soil and emerge in the spring. By adding new garden soil to the container as the plant grows very likely interferes with the life cycle of the beetle. Give it a try and see if it helps.
Food Grade Diatomaceous Earth (D.E.) is a good general purpose organic method of pest control in the garden. Diatomaceous earth consists of fossilized remains of diatoms and may be found in many products including toothpaste.
Follow the product instructions, including wearing a dust mask, as you apply it. Dust the diatomaceous earth lightly and evenly over your potato leaves and the Colorado potato beetles. The microscopic sharp edges work by damaging the outer shell of the pest as well as damaging and dehydrating the inside after they ingest it.
For the first application purchase the diatomaceous earth in a duster. When it is empty you can reuse it and refill it from a larger bag.
Do not use the diatomaceous earth that is used in swimming pool filters, which has been heated and converted into a product that is no longer food grade and should not be used in the garden.
The diatomaceous earth that is in the pest control section of your garden center is the type to use.
The Colorado potato beetle has developed resistance to a wide range of pesticides, which should not be used in an organic garden.
A natural biological control is to apply B.T. which is Bacillus thuringiensis. There are many different varieties of B.T. The variety to look for is the variety “San Diego” which is considered to be the best at killing the larva. This is a naturally occurring bacterium which kills the larva and is a safe non-chemical way to control the Colorado potato beetle.
Potato scab is a fungal infection that affects the surface of the potato. Potatoes do better if grown in an acidic soil with a pH of 5.6 to 6.0 and will reduce the occurrence of potato scab.
Popular Varieties
Russet potatoes are the familiar oblong white flesh potatoes usually found in the grocery stores and restaurants. Russet potatoes have a high starchy taste that when baked usually get covered with butter or sour cream.
If you want to try some really good tasting potatoes plant several varieties. Be aware that the skin color does not always mean that the flesh is the same color as the skin. Red Norland, Red Pontiac and Viking Purple varieties have white flesh.
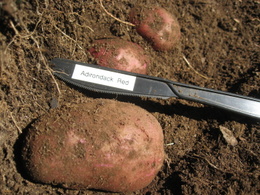
Some popular white varieties are: Kennebec, Yukon Gold, Yellow Finn, Adirondack Blue, Adirondack Red, Banana Fingerling, Red Norland, Viking Purple, German Butterball, Russet, Red Pontiac and Russian Banana.
For an extra health benefit and great taste, the blue and red flesh potatoes such as the Adirondack Blue, Adirondack Red and Purple Majesty should be tried. These are high in the antioxidant anthocyanin, which is also found in many other foods such as blueberries, raspberries, cherries, eggplant and pomegranates.
The potatoes you grow yourself have more flavor and do not have the starch-like taste of the supermarket kind. Be sure to grow some of the red, blue and purple varieties. They almost have a slight sweetness to them and all that is needed is a garnish of parsley topping them. Loads of butter and gravy are not required to make them palatable.
Potatoes are very easy to grow and with the many varieties available should be included in every garden.
Sources: Seeds Now, Burpee, Johnny’s Selected Seeds
Tips and Warnings
If the upper portion of the potato tuber is exposed to sunlight it will turn green. To prevent this from happening just place enough soil over the potato to cover it.
The green portion of the potato contains a natural toxin called solanine which is a mildly poisonous alkaloid. Solanine is also found in the potato’s leaves and stems and is the method potatoes use to defend it against insects, diseases and herbivores.
If you see a small green area, just cut away the portion that is green, or save it to use as a seed potato to plant next year. The same holds for a fully green potato.
Garden Spikes newsletters give you timely information once or twice a month. Subscribe Free to the Garden Times newsletter below.
Your email address will only be used to send you a newsletter and will never be sold. You can unsubscribe at any time.
