Tomato Growing Guide
Tomato (Lycopersicon esculentumare) is a very popular annual vegetable. Botanically it is the seed bearing fruit, which grows from the flowering part of the plant. The common usage is as a vegetable. In 1893 in the case of Nix v. Hedden the U. S. Supreme Court ruled that it was a vegetable and was subject to an import tax as other vegetables were. Imported fruits were not taxed.
The taste of a just picked tomato far surpasses what comes out of a grocery store. There are hundreds of varieties of every plant size, fruit size and color.
Types of Plants
There are 3-major categories of tomato plants. The first type is the determinate bush variety, which produces earlier and is suitable for growing in containers. These may reach a mature height of 3 to 4-feet depending on the variety and growing conditions.
The second type is the indeterminate variety, which produces vines that continue to grow throughout the growing season and without pruning will reach heights of 10-feet or more.
The third type is the dwarf variety. These are often grown in pots and hanging baskets. Dwarfism is a recessive trait which limits the number of varieties.
You can find early season varieties: 52-70 days, mid-season varieties: 70-80 days and late season varieties: 80-days or more. The number of days to maturity is counted from the time the plant is put in the ground. The weather, air temperature, soil temperature, rain and other growing conditions all affect when the first tomatoes get ripe.
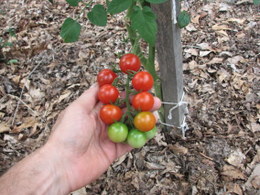
Size can range from the small cherry, the medium 8 to 12-ounce size to the large beefsteak that can exceed 2-pounds.
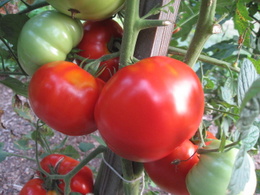
The colors can range from red, pink, purple, yellow/orange, green and stripped. Growing several different colors will give you a nice rainbow of colors for your salad.
Starting from Seed
Follow the seed packet instructions, seeds can be started indoors 6 to 8-weeks before your last expected frost date.
Sow the seeds 1/4-inch deep in a sterile seed starting mix in cell packs or pots. Lightly cover with the seed starting mix and keep moist. Germination takes 7 to 14-days.
Bottom watering is the easiest way to keep moist without disturbing the newly sown seeds.
When your plants have 2-sets of true leaves they should be transplanted into 3 to 4-inch pots. This will ensure that there is enough room for strong root development.
For more detailed information visit the seed starting page.
Soil Preparation
They should be planted in full sun and in a nice loose well-drained garden soil. Tomatoes do best in a slightly acid soil with a pH range of 6.0 to 6.8.
When to Plant
Tomatoes are easily damaged by freezing temperatures. They also do not like it when temperatures drop below 50-degrees.
The best time to plant them is 2-weeks after your last predicted frost date. At that time the air temperatures will be warmer and also important is that the soil temperature will be warmer as well. The best day to plant them is on a warm, cloudy and wind-free day.
To get your tomatoes off to a good start they should be hardened off before planting in your garden. Hardening off is the process of taking them out of the indoor environment and getting them used to the outdoor environment.
They should be hardened off by putting them outside in a protected area on a warm day to let them get used to the cooler outdoor temperatures and direct sunlight before planting them.
On the first day place your plants near your home or another sheltered location with an eastern or western exposure for a few hours of filtered sunlight and then bring them inside. One or two layers of window screen shading the plants will keep them from getting burned.
Repeat this each day increasing the amount of time and exposure to the sun and wind. Inspect your plants daily to be sure they have enough water and look healthy. If they appear to be stressed back off on the amount of exposure.
After about a week you can leave them outside overnight unless the night time temperature drops below 50-degrees. When you leave them out overnight be sure to protect them from deer or other animals.
A cold frame is the best way to harden off and get your plants established with a healthy root system. During the warm days you should open or prop up the cover so that your plants do not get burned from the hot sun. Be sure to close the cover at night when it gets cold or to protect them from frost. Always remember to prop up or fully open the cover on a sunny day. The heat from the sun can cook your tomato plants and kill them.
If you go not have a cold frame, then you will need to bring your seedlings inside at night when it gets cold.
Planting Tomatoes
Plant them several inches deeper in the ground. They can be planted right up to the lowest set of leaves. The plant will grow more roots along the stem, which will result in a stronger root system.
Plant them at least 2-feet apart. If you have the room 2-1/2 to 3-feet apart is better. Giving them enough room will allow the maximum amount of sun to reach all of the leaves. Air circulation is important to minimize the many diseases that affect tomatoes. The root system is shallow but the roots can exceed 6-feet in length.
After planting a nice 3 to 4-inch layer of mulch such as shredded leaves or pine straw will help keep the soil moist and the root zone cooler during the hot summer days.
Growing Methods
They can be grown in cages, on stakes, in raised beds, in containers as well as letting them grow natural.
Tomato Cages
Cages are preferred by many gardeners because it reduces the time to care for the plants. Most of the small cages found in garden centers are adequate for a determinate plant that may reach a height of three feet. They are too small to contain an indeterminate plant which may grow over 10-feet long.
An inexpensive cage can be made from a 42-inch by 84-inch reinforcing mesh sheet that costs under $8.00 from a big box store. It will be in the area near the masonry supplies and is used for reinforcing concrete sidewalks and driveways.
All you need to do is place it on a smooth surface and bring the 2-ends together connecting them with plastic cable ties or wire in several places. Roll it around and press down with your hands to make a nice round circle. The end result will be a cage that is 42-inches high and about 26-inches in diameter. Its 6-inch openings are large enough to reach inside to pull out your tomatoes.
Cages can also be made from fencing, but make sure that the openings are large enough.
After your plant is in place put a nice layer of mulch down around it and place your cage over the plant.
Staking
Growing on stakes is a popular way to grow them. The typical stake is 7-feet long with about 1-foot pushed into the ground. The stake should be sturdy, at least 1-inch in thickness to support the weight of the vine and tomatoes. As the vine grows it should be loosely tied to the stake about every 6 to 8-inches.
Since an indeterminate plant can grow over 10-feet in length it is normally clipped off at the top of the stake. Staking the plants two to three feet apart will allow them to get the sun they require and air to circulate to keep the leaves dry lessening disease problems.
Tomatoes do well in a raised bed. You can squeeze 8-plants on stakes into a 4-foot by 8-foot raised bed, but your tomatoes will do better with 6-plants in that space. They need to get enough sunlight and air circulation to prevent disease. Shorter plants such as peppers and lettuce can be planted in front, where they can get full sun.
As the plants grow it is good practice to remove any leaves at the bottom of the vine, which might be touching the ground or showing signs of early blight. It is also a good gardening practice to remove and discard any dead leaves that fall on the ground.
Inspect your plants often and prune out any excess suckers. Allowing 3 to 4-suckers to continue to grow will keep things neat and make it easy to tie the vines to the stake. If you let too many suckers grow it become very difficult to tie them to the stakes and the plants get very top heavy and are likely to blow over in a heavy wind. After you remove a sucker it will often grow another one. Instead of cutting the sucker very close to the main stem leave a stub an inch or more longer. Leaving a short stub will fool the plant and it usually will not send out another one.
Containers
If you do not have a lot of space you can plant your tomatoes in containers. The container should be at least 5-gallons in size and have proper drainage. The roots of the plant need room to grow and get the nutrients needed to produce tomatoes. Determinate varieties are the best choice for containers. All plants grown in containers will dry out quickly and need to be watered regularly to keep the root system moist. Another way is using a tomato planter or grow bag such as one from Gardener’s Supply Company. Another popular container is a Grow Box from The Garden Patch.
The smaller dwarf determinate varieties can be successfully grown in 1 to 2-gallon containers. Elfin, Micro Tom, Patio, Sprite, Tiny Tim, and Tumbling Tom are some examples of varieties that can be grown in small containers and even hanging baskets. To grow them indoors over the winter, you will need to use grow lights to give the plants enough light.
Even if you have a garden full of tomato plants, it is good to have some in containers to extend your season. If frost is predicted you can move the containers indoors or to a protected area, such as a garage or sun room. When the frost danger is over you can put them back outside in full sun to keep on growing.
Naturalizing
Tomatoes are a vining plant and the natural way is to let them grow on the ground. They can spread out and take up a bit of room, but require very little care.
Plants are more likely to be affected by diseases from being so close to the ground with rain splashing soil on the leaves. Pests such as snails and slugs are also a problem.
A three to four inch layer of mulch will help keep them clean. Letting them grow naturally and leaving the sucker growth remain will yield a large crop of tomatoes.
Watering and Care
When the plants are a few inches tall add a nice loose mulch of shredded leaves or pine straw to shade the plant roots. This will keep the weeds out, the soil cooler and help retain moisture. Keep the mulch a couple of inches away from the stem. During dry spells give some water each week.
If needed you can feed with an organic balanced vegetable garden fertilizer such as Espoma Tomato-Tone.
Pests
Tomato hornworm is a Sphinx moth caterpillar that will strip off all of the leaves from your plant. Their colorization allows them to blend in very well. The first sign that they are there is when you notice all of the leaves are gone which is usually when you find them.
The hornworm can be controlled by applying B.T. to your plants. B.T. which is Bacillus thuringiensis is a natural biological that will kill many kinds of larva. There are many different varieties of B.T. so check the label or ask which one to use at your garden center.
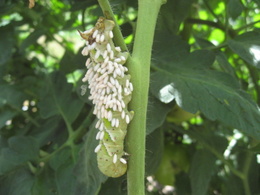
One natural enemy of the hornworm is the parasitic braconid wasp, which lays eggs on the hornworm, which then hatch and burrow into it. The wasp larva feeds on it and kills it and in the process will bring about many more parasitic wasps.
If you see a tomato hornworm with many white capsules on it, you should leave it alone. The white capsules are the pupa of the parasitic wasp which has fed on the hornworm. It may move a little bit but it is “essentially dead” and will not do any more damage. When the adult wasps emerge they will hunt for other hornworms to parasitize.
Diseases
Tomatoes can be affected by a number of diseases. If you have had serious disease problems in the past, the ones you planted may not have been disease resistant varieties.
One method seed company’s use is to grow large numbers of tomatoes under the worst conditions. They will grow them in the same place year after year and encourage the occurrence of diseases. After many years they will pick out the varieties that are disease resistant.
When buying seeds look for a variety that has some disease resistance. You should see some letters such as: VFNTA, VFF, VFFT, VFFF, VFFNA, VFN, VFFNTA, etc. These letters indicate the diseases that the variety is resistant to. Here is the meaning of the code.
Disease Resistance Codes:
V = Verticillium wilt resistance
F = Fusarium wilt race 1 resistance
FF = Fusarium wilt races 1 & 2 resistance
FFF = Fusarium wilt races 1, 2 & 3 resistance
N = Root-knot nematode resistance
T = Tobacco mosaic virus resistance
A = Alternaria resistance
Early blight is caused by the fungus Alternaria solani and is seen as yellowing and dying leaves starting on the lowest leaves. As soon as you see it occurring remove the diseased leaves and put in the trash. Do not add any diseased plant material to your compost pile.
Also look closely at the ground and pick up and discard any dead dried up leaves as well. The blight spores live in the soil. Putting a nice layer of pine straw or shredded leaves all around your tomato plants helps prevent soil from splashing up onto the lower leaves. This mulch will also keep the soil cooler and slows the evaporation of moisture from the soil surface.
Late blight is also a fungus which infects the stems and the tomatoes which turn black and rotten. It usually shows up later in the growing season and often kills the tomato plant. If this should happen discard the entire plant in the trash and remove any dead leaves that have fallen on the ground.
Other diseases are Anthracnose and black mold. It helps to select disease resistant varieties and growing your tomatoes in a different location each year.
You are less likely to encounter some diseases by starting your tomatoes from seed. There are many more varieties available from seed. Do not start your tomato seeds too early. Starting them about 6-weeks before the last expected frost is early enough.
Some of the best tomato seeds can be found in catalogs such as 'Tomato Growers Supply' and 'Totally Tomatoes.' Both catalogs contain many other plants in addition to tomatoes. You will be impressed with the many varieties that are available. They also list the diseases that the varieties are resistant to and good information on growing them.
Problems
Blossom end rot is due to lack of available calcium in the soil, low soil pH, too much fertilizer or uneven watering.
Bonide makes ‘Rot Stop’ that can be applied.
Some gardeners when planting place 3 to 4-tablespoons of crushed egg shells in the hole. Lightly stir into the soil as you place the plant in the ground.
Eggshells should be saved all year long. Give the eggshells a quick rinse and put in a container to dry. From time to time grind them up in a blender a few at a time. The eggshells from 12-eggs, when crushed in a blender are about 4-tablespoons.
You can also place dried eggshells in a box and crush them with your feet. They can then be added to the soil or compost pile.
Cracks in the skin are caused by rapid growth due to heavy rain or watering following a dry spell. Supplemental watering to keep the soil moist will keep tomato growth at an even rate.
Cat facing is that weird puckered up look on the bottoms of the larger sized tomatoes. It is believed to be caused by an abnormal development of the flower bud. Environmental conditions such as temperature extremes, especially nighttime temperatures below 55-degrees at night followed by daytime temperatures in the high 80s or 90s are the cause.
Popular Varieties
Early season (52 to 70-days):
Bush Beefsteak
Bush Celebrity
Bush Early Girl
Early Girl
Sun Gold
Sweet 100
Sweet Million
Mid-season (70 to 80-days):
Better Boy Hybrid
Big Beef Hybrid
Big Boy Hybrid
Celebrity Hybrid
Homestead
Jetstar
Rutgers
Sun Sugar
Late Season (80-days or more):
Amish Paste
Beefsteak
Brandywine
German Giant
German Johnson
German Red Strawberry
Giant Belgium
Goliath
Hungarian Heart
Oxheart
Super Beefsteak
Ultra Boy
Ultrasonic
Dwarf Tomato Varieties:
Elfin
Micro Tom
Patio
Sprite
Tiny Tim
Tumbling Tom
Sources: Seeds Now, Tomato Growers Supply, Totally Tomatoes Company
Garden Spikes newsletters give you timely information once or twice a month. Subscribe Free to the Garden Times newsletter below.
Your email address will only be used to send you a newsletter and will never be sold. You can unsubscribe at any time.


